Sabtu, 14 Januari 2012

Tutor instalasi Theme ICS (XDA) FIX NOTIFIKASI GYoung

Do-not Install Theme before Installing Deodex.zip File.


Link to Deodex.zip File(80Mb) -> Deodex.zip


Link to Theme(26Mb)           -> Themes ICS

1. donlod kedua file yang udah di lokalin diatas

2. masukk ke rootex dari HH agan.masuk ke system/app cari file axT9IME.apk lalu hapus.

3.[OPSIONAL] kalo udah di donlod file deodexnya..buka file deodex tersebut di winrar tapi jangan di extract
..masuk system/app cari file axT9IME dan hapus file tersebut (ingat file jangan di ekstrak

4. kalo udah di hapus..keluar dari winrarnya..

5.kalo udah selesai donlod kedua file deodex maupun ics theme skrg saatnya bekerja

6. pindahin kedua file ke HH agan..setelah di pindah langkah pertama adalah masuk ke recovery :) dan apply update from sdcard pilih deodex, kalo udah langsung boot aja. :)

7.nahh di step ini jangan takutn kalo bootnya agak lama..karna dalvik cache dalam tahap pengisian ulang karna rom agan udah deodex..setelah masuk ke homescreen..akan ada notif swype fail..abaikan :D

kalo udah puas liat hasil deodex..

8. masuk ke tahap recovery lagi dan apply theme ics yang agan donlod tadi..
prosesnya agak lama...tapi aman ko'

9. setelah masuk ke homescreen puas"inn dahh liat ICS nya :D
*NAH DISINI BUGNYA= NOTIFIKASI HILANG .
CARA MEMUNCULKANNYA KEMBALI :
A. INSTALL DULU TEMA LAIN SESUAI ROM .
MISAL ROM 2.3.6 DONLOT TEMA INI ROM 2.3.6 themes
B. NEXT, INSTAL KEMBALI TEMA YG DARI XDA TADI .
SAMPAI DISINI SEHARUSNYA NOTIFIKASI SUDAH MUNCUL :)

10.[OPSIONAL]ini langkah terakhir yaitu optimalisasi :)..donlod xultimate disinixultimate.zip
kalo udah di donlod..extract file xultimate di kompie/lappie agan...kalo udah diekstrak,masuk ke folder ekstrak..cari test..sebelum test tancepin dulu SGY agan...kalo udah tancepin start test...kalo di bagian odexnya fail berarti sukses deodex :Dsetelah bagian test selesai masuk ke main.exe ..tunggu sampai muncul menu 1-15...kalo udah muncul..pilih menu 15 lalu pilih menu 13.optimize all apk's ..kalo udah maka akan muncul pilihan 1-3..pilih menu 1.normal(quick) dan tunggu prosesnya...kalo sukses maka akan ada notifnya..dan selamat hh agan udah deodex , zipalign dan terpasang tema ics :)


DO WITH UR OWN RISK

RESIKO DITANGGUNG PENUMPANG :D

by pratyush.creed

Jumat, 06 Januari 2012

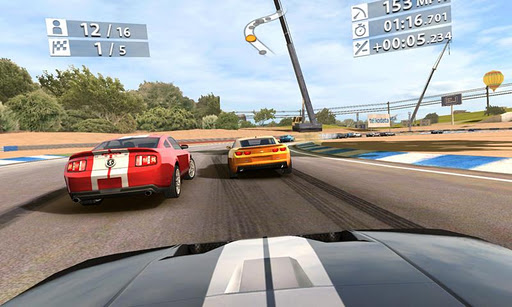
Real Racing 2 HD


A Real Treat from EA Mobile. A breath taking racing game. Just made for
the ones who love to be friends with speed. But just these guys kept it shabby
for us by making the game work on Galaxy Y.

FEATURES -

• Test your racing prowess on a 16 car grid against highly skilled AI drivers.
• Select from 30 officially licensed cars including the 2010 Ford Shelby Mustang GT500, 2010 Nissan GT-R (R35), 2012 McLaren MP4-12C, and more!
• Work your way from rookie to pro in a robust Career Mode, offering 10 hours of racing enjoyment. Jump into a Quick Race for instant fun – or race against the clock in Time TrialMode. 
• Race in 15 beautiful locations, with 40 miles of highly detailed race tracks, speedways and city circuits – including twilight and night races.
• Touch or tilt to steer, as you experience state-of-the-art handling with customizable options that tailor to your personal driving style.


Tutorial -

1) Root your Galaxy Y (or equivalent QVGA device). If you haven't then visit here 
HERE

For those who don't know whats rooting click here - HERE

2) Download and Install Chainfire3D (Wont work if the phones not Rooted)
Link - HERE
3) Download Chainfire3D plugins
Link - HERE
4) Unzip the Plug-ins.zip archive in the SD card
5) Open Chainfire3D and click on 'Install Plugin
6) The app will search for the plugins in the phone and prompt about them on the screen
7) Install all the plugins namely - libGLEMU_NVIDIA, libGLEMU_POWERVR and libGLEMU_QUALCOMM
8) Download the APK and the DATA 
APK Link - 
LINK
DATA Link - (password - galaxyyclub)
LINK
9) Install the game and press 'Done'
10) Download and Install 'Titanium Backup'
LINK

11) Download Real Racing 2 backup file from here - LINK

This will contain files inside named  ------

com.ea.game.realracing2_row-20111222-191624.tar.gz
com.ea.game.realracing2_row-9368549548d24279f8b14bf23290f08c.apk.gz
com.ea.game.realracing2_row-20111222-191624.properties

12) Now place these files in your SD card in /TitaniumBackup
13) Open Titanium Backup and  select 'Backup/Restore'
14) After opening 'Backup/Restore' find 'Real Racing 2' in the App list and after finding click on it.
15) There will be a window which will be asking you different options, just click 'Backup' on it
16) Copy the DATA folder named 'com.ea.game.realracing2_row' to Android/data/*HERE*
17) Open Chainfire3D and and open 'Default OpenGL Settings' and tick  'Reduce TextureQuality' and also tick  'Reduce Texture Size' and open 'Use Plugin' (Just Below the 'ReduceTexture Quality' tab) and select 'QUALCOMM'
18) Minimize Chainfire3D
19) Open the game
20) (The most important step) Enjoy the game!

Kamis, 05 Januari 2012

TUTORIAL PARTISI SD CARD with MINI TOOLS PARTITION

cara mempartisi SD Card android banyak berbagai caranya. tapi cara yang saya berikan ini adalah cara yang mudah, bahkan untuk orang awam sekalipun bisa tapi harus mengikuti langkah dengan benar

1. backup/pindahkan dulu data pada SD Card kalian di pc/laptop. karena SD Card akan di Hapus dan Format Partition.

2. Download Sofware untuk membuat partitionnya, anda bisa memakai Mini Tool Partition Wizard
mirror:  Link MF

3. Install MiniTools di PC

4. Masukan sdcard ke card reader lalu colokin ke PC

5. Jalankan Mini Tools


6. Delete Partiton SD Card menjadi unallocated lalu Klik Create Partition


Partisi 1 ini untuk data utama seperti lagu, gambar, video, dll, jadi buat aja besar
• Create as : primary,
file system : fat32,
sisakan ¼ bagian memory utk ext2


Partisi 2 ini untuk simpan data yang dipindahkan ke kartu SD. (data aplikasi yg terinstal di memori telfon)
• Create as : primary,
file system : ext2,
sisakan 100mb utk linux swap ( untuk ext2 sebaiknya max 1,25gb )


Partisi 3 ini optional, bisa anda mau buat atau tidak tergantung anda karena kegunaan swap ini sebagai virtual memori penjelasannya jika RAM kehabisan alokasi memori, bisa di simpan di swap partisi ini bisa dibilang untuk membantu sistem bekerja lebih cepat, tetapi ada yang bilang semakin gede semakin bagus, ada yang bilang tidak terlalu terasa kegunaannya, ada juga yang bilang tergantung ROMnya, kalau saya sendiri tetap saya buat untuk jaga-jaga saja.
• Create as : primary,
file system : linux swap,
pakai 100mb sisa utk linux swap ini ( max partisi linux swap ini adalah 100mb )


~ nah, jika sudah dibuat seperti yang diatas. langsung aja di klik tombol apply pada pojok kiri atas di layar

~ tunggu hingga semuanya selesai.

~ selamat microSD agan sudah di partisi.

7. Untuk Partition Tergantung dari besar dari SD card kalian. Jika Mempunyai SD Card yang lumayan besar kalian bisa membuat partition ke3 dengan format Swap. Partition Swap digunakan
untuk membantu kerja RAM. dan biasanya partition swap dibuat sebesar 2 kali besar RAM.

8. Setelah selesai klik APPLY pada pojok kiri atas untuk mengeksekusi partition yang telah kita buat.

SD CARD 2GB:
-FAT: 2GB primary sisain 600MB
-Ext2: 600MB primary sisain 100MB
-Linux Swap: primary 100MB

SD CARD 4GB:
-FAT32: 4GB primary sisain 600MB
-Ext2/3/4: 600MB primary sisain 100MB
-Linux Swap: primary 100MB

SD CARD 8GB:

-FAT32: 8GB primary sisain 600MB
-Ext2/3/4: 600MB primary sisain 100MB
-Linux Swap: primary 100MB

sampai sini selesai membuat partition untuk SD card android kalian.
untuk memindahkan aplikasi dari memory phone yang telah terinstall ke SD Card kalian bisa menggunakan aplikasi LINK2SD atau MOVE2SD dan aplikasi lainya yang ada dimarket. download dan install.
Selamat mencoba dan hati-hati. apapun yang terjadi, kehilangan data-data atau lainya diluar tanggung jawab penulis.

Rabu, 04 Januari 2012

MIUI LOCKER (LOCKSCREEN)


1 . locker ini hanya untuk ponsel android MINIMAL BER OS GINGGER BREAD
2 . download Locker nya disini


3 . install dan Download file lockscreen *.mtz (theme lockscreen yg d bawah)
4.  Copy file lockscreen (yg berformat .mtz) ke sdcard/MIUI/theme 
5.  Apply si Lockscreen d app Miui Lockscreen 

note :: perbedaan LDPI, MDPI dan HDPI
LDPI ( resolusi layar 230x320)
MDPI ( resolusi layar 340x480 abouve)
HDPI ( resolusi layar 480x800 )

tips :
- saat instal MIlocker akan ada theme lockscreen bawaan,,
nah buat yg LDPI jngn gunakan theme   lockscreen bawaan MIlocker
karna resolusinya belum pas alias masi MDPI/HDPI

- instal juga MIUI musik agar widget musik d lockscreen jalan dan
bisa memutar musik saat hp dlm kondisi terkunci


# note !!
ini link buat  ldpi ( galmin , galaxy y)


created by android indonesia di sunting oleh agan putut


Color_FiveTargets v1.2

http://adf.ly/4KUjD


samsung galaxy S (yg puzzle)

http://adf.ly/4KXYo


- zipper (rel sleting)

http://adf.ly/4KXaW


TRANSFORMER (fixed)

http://adf.ly/4KT2e


-Iphone lockscreen v2

http://adf.ly/4KUgT


-Side Kick

http://adf*ly/4KVmR


-SLDDown_v2

http://adf*ly/4KVqR


-ColoROU UI MIUI Lock Tweak

http://forum.xda-developers.com/showpost.php?p=20539355&postcount=6


-devras MILOCKER

http://dl.dropbox.com/u/54106918/updown.mtz